Blueberry Baked Oatmeal

photo (2)

I’m always looking for new and exciting recipes to try and I happened to stumble across this gem. I made it right away today and as you can see, I already dipped into it, for the sole reason of reporting how good it is of course! This recipe calls for basic ingredients, most of them should be in your pantry already. I put all my ingredients into MyFitnessPal recipes and it came out to 147 calories for 1/2 cup serving with 19g of carbs and only 6 grams of fat. The ingredients you will need are:

Ingredients:

  • 1 cup old fashioned oats (not the quick cooking kind)
  • 1/2 tsp. baking powder
  • 3/4 tsp. cinnamon
  • pinch of salt
  • 1/4 cup maple syrup. Now I use Walden Farms calorie free, gluten free, carb free, sugar free syrup

photo (1)

  • 1 cup of milk (I used Pure Silk Coconut milk, made it taste awesome)
  • 1 large egg beaten
  • 2 tbsp. unsalted melted butter
  • 1 tsp vanilla extract
  • 1-3 bananas (depending on the size of your baking dish)
  • 1 cup blueberries frozen or thawed

Directions

  1. Preheat oven to 375F
  2. Lightly grease your 2 qt baking dish, I just used a stick of butter and rubbed the bottom. In a bowl, mix the oats, baking powder, cinnamon, and salt. Stir to mix it all up. In a separate bowl, mix syrup, milk, egg, butter and vanilla
  3. Cut up the bananas and place the slices across the bottom of your baking dish. In my glass 2 qt dish I used 1 1/2 bananas to do this. Cover the bottom with the bananas. Put half the blueberries on top of the bananas. Sprinkle the dry mix on top of the blueberries making sure to get an even layer out of it. Pour the liquid mix on top of the dry mix, don’t stir it up, just leave it on top.
  4. Sprinkle the rest of the blueberries on top of the liquid mix and bake in the oven for 35-40 min or until the top is browned and the oats have set.

Enjoy!

Follow along on twitter or instagram and on pinterest

Muscle Group of the Week: Leg Workouts

First I want to apologize for going so long between posts. I know not too many people read this but it seems my frozen turkey debacle was a big hit on thanksgiving. My find of putting the turkey in a cooler while it thaws was a gem and it worked perfectly. I wish I had saved my pictures of our Thanksgiving meal but I did hang on to the homemade apple pie we had!
photo
Needless to say the pie did not last long. Eventually I hope to add it to the recipes section on here. I feel those are lacking in quantity and quality.

Now, on to leg workouts. Today I will post a handful of pictures that explain pretty well how to perform these exercises. As always, you should aim to do 3-4 sets with 8-12 reps. Going heavy on leg day is a good idea because they are such a large muscle group. They can be hard to build muscle in so by going heavy you are really creating work for your body.

Sumo Deadlifts
b0c6165834567cb5393f80a7a18d7dd0
Sumo Deadlifts are great because they work the quads, hamstring, glutes and your back. Deadlifts in general are a compound exercise that should be in everyone’s arsenal.

Deadlifts
1978ba3fb3ee211fc8743a876bb0760f
As you can see in the picture, deadlifts work more than just the legs. If you have never done deadlifts before, be sure to start light and watch some videos on proper form. This is one exercise where if performed incorrectly, you can really do some damage.

3384c1b6f3c0feae1a33dcbdf8081206

This image shows many other exercises that all should be incorporated into your workout. The front and back squat should be required. They really target the quads and will give nice development to them. Leg press is another great way to fatigue the quads. Again, if you’ve never done these, go light for the first few times. If you can complete 12 reps for 3-4 sets then it’s time to up the weight. Leg extensions and leg curls are a good superset to really fatigue the muscles as well. Try to do 15 reps if you do these towards the end of your workout. You can also pyramid any of these sets. Start light and go 15, 12, 10, 8, 6, 4, 2, 1, 1, 2, 4, 6, 8, 10, 12, 15. It’s guaranteed you’ll have trouble walking the next day!

One group people neglect is the calf muscle. If your gym has sitting or standing calf machine please add these in to your workout.
photo
Another thing people don’t do is vary the angle of the calf muscle. Just keeping your feet pointed forward only targets the main muscle, the gastrocnemius. Pointing your toes inward and outward will develop the Soleus and Plantaris.
calf

Please whatever you do, just don’t let this happen to you. Friends don’t let friends not lift legs:
tumblr_m6ou97nZtU1qzmh66o1_500

Halloween ABS: 13 in 2013!

abs

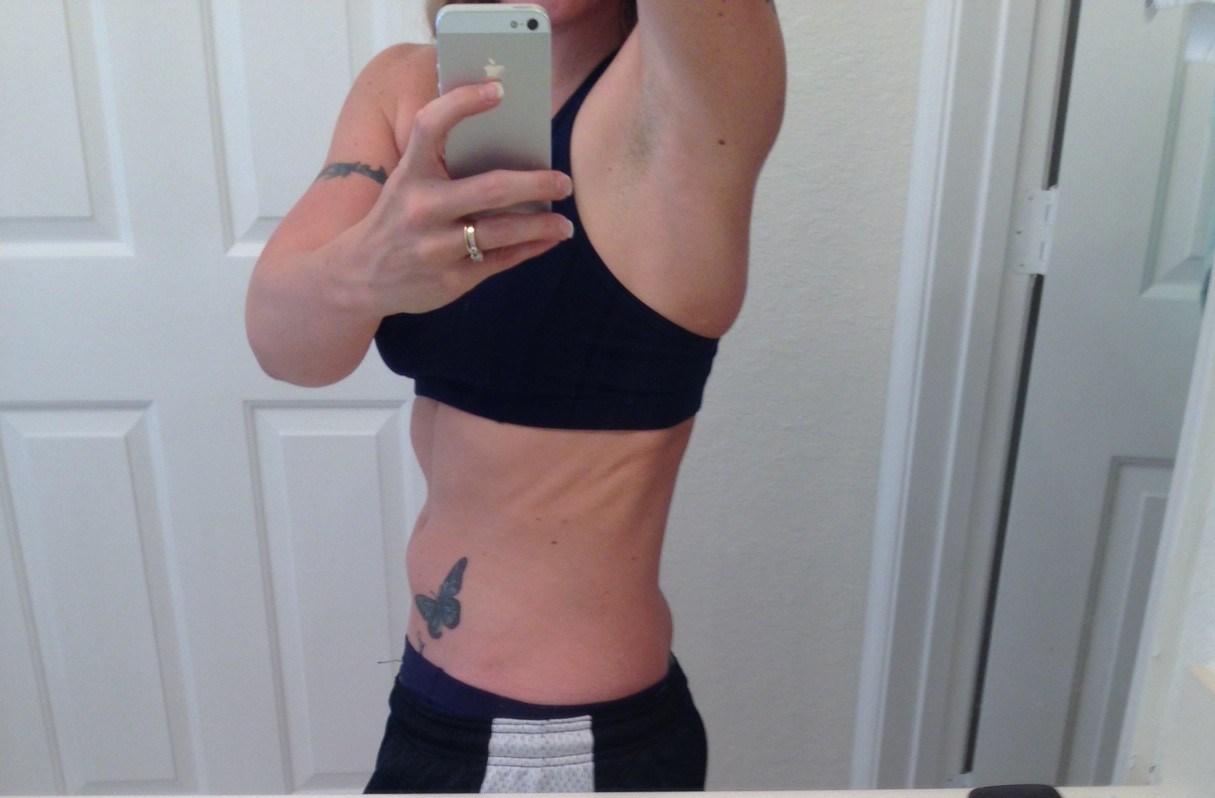
Most of you have heard this before. Diet is 70% of your weight loss or muscle growth journey. While this is true, today we are going to give you 13 fantastic abdominal exercises that you can do right at home or in the gym. I get questions from people all the time about how I get my abs to show, and while they aren’t quite at the 6 pack formation I want just yet, they are coming along quite nicely:

photo 1 photo 2

I try to maintain my diet as much as possible but usually on the weekends I let it slack a bit as I don’t go to the gym either those two days. That being said, here are 13 exercises that might make you feel a little bit better after eating all that Halloween candy!

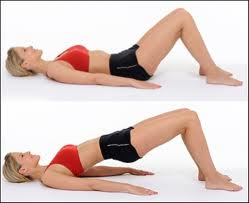
1. Body Weight Bridge

untitled

Lie down on the floor. Keep knees bent and feet on the floor. Wrap arms around your upper body. Lift your hip upward. Hold for one second. Return to starting position

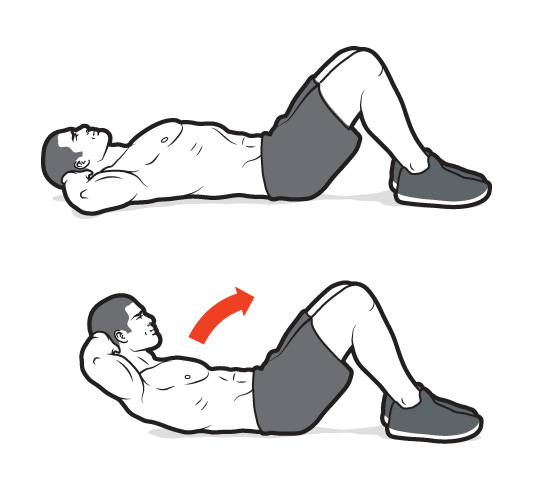
2. Body Weight Crunch

crunch

Lie down on the floor. Feet are flat on the floor and knees are bent. Position hands behind your head but do not pull on your neck. Raise your upper body upward while keeping your lower back on the floor. Hold for one second. Return to starting position.

3. Body Weight Bicycle

bicycle-crunches-henry-cavill-workout-08112011

Lie down on the floor. Lift legs so that your thighs are perpendicular with the ground. Put hands behind your head but do not pull on your neck. Move left elbow and right leg toward the body until they touch. Move left elbow and right leg back to starting position. At the same time, move right elbow and left leg toward the body until they touch. This is one repetition.

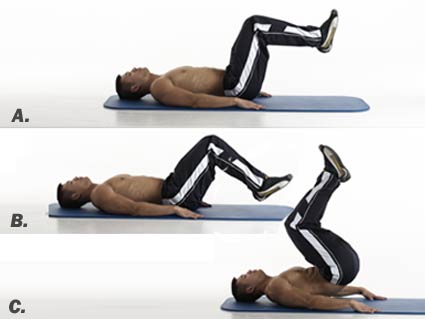
4. Body Weight Crunch Reverse

reverse-crunch

Lie down on the floor. Lift legs so that your thighs are perpendicular with the ground. Position hands at your sides to stabilize position. Lift lower body towards the ceiling. Stop when only upper back is touching on the floor. Hold for one second. Return to starting position.

5. Heel Touch

altheeltouch2s

Lie down on the floor. Feet are flat on the floor and knees are bent. Position arms to your side. Lift shoulders off the floor. Touch your left heel with your left hand. Hold for one second. Return to starting position. Touch your right heel with your right hand. Hold for one second. Return to starting position. This is one repetition.
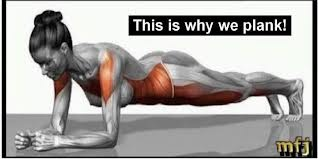
6. Plank

untitled2

Lie prone on the floor. Raise yourself up so that only your toes and forearms are on the floor. Keep your back straight. Hold for as long as possible.
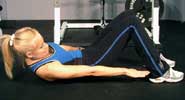
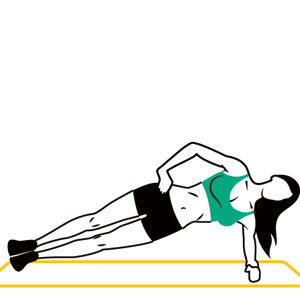
7. Side Plank

1203-side-plank

Lie on your side. Make sure one leg is on top of the other. Position your forearm on the floor perpendicular with your body. Use your forearm to lift your upper body off the ground. The other arm is placed on the side of your body. Hold for as long as possible.

8. Body Weight Pull In Seated

93_1 93_2

Sit at the end of the bench and hold onto the bench with both hands. Lie back and raise your legs until you reach a position of balance. Keep legs straight. Bend Legs toward your upper body while you simultaneously move your upper body towards your thighs. Hold this position for one second before return to starting postion.
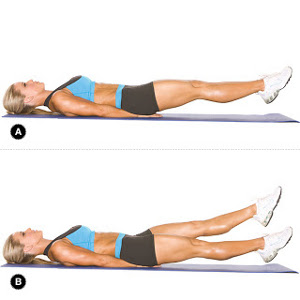
9. Scissor Kick

scissor-kick-1

Lie down on the floor. Place hands next to your sides. Extend legs fully and slightly elevated. While keeping legs straight, raise one leg up. As you lower leg, raise the other leg up. This is one repetition.
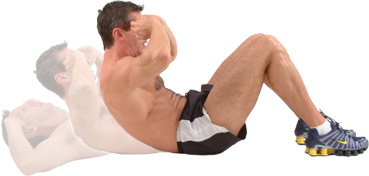
10. Sit-Up

160

Lie back on the floor. Put hands behind your head but do not pull on your neck. Knees are bent and feet are on the floor. Raise your upper body upward. Hold for one second. Return to starting position.

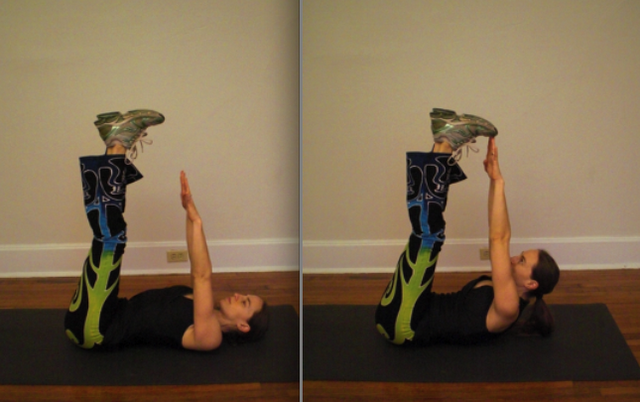
11. Body Weight Toe Touch

toe-touches

Lie down on the floor. Lift legs until legs are pependicular with the floor. Fully extend your arms above you. Reach for your toes with your hands. Hold for one second. Return to starting position.

12. Bodyweight Twist

wm-0807-twist-windmill

Lie down on the floor. Lift legs until thighs are perpendicular with the ground. Keep legs straight. Fully extend your arms to your sides. While twisting the upper body, lower your legs to one side. Hold for one second. Return to starting position. While twisting the upper body, lower your legs to the other side. Hold for one second. Return to starting position.
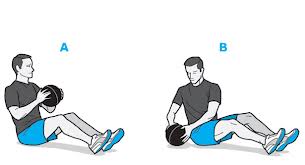
13. Russian Twist

imagesCAM05HRR

Sit down with your feet flat on the mat. Your knees should be bent. Lean back slightly. Position your hands together and keep your hands in this position for the rest of the movement (you can also hold a light dumbbell or medicine ball for more advanced exercise). Your arms should be perpendicular with your upper body. Twist your torso in one direction. Hold for one second. Twist your torso in the other direction. Hold for one second. This is one repetition.

So there you have 13 abdominal exercises to add to your arsenal. Complete each one 25-30 times. If you can not do them without stopping, take a break as many times as needed but complete 25-30 reps, 3 sets for each exercise. You don’t need to do all 13. Pick 3 for lower abs, 3 for your obliques and 3 for upper abs and this will round out your workout. Next week we will post a sample diet to follow while you try to bring out those abs! Happy Halloween everyone and be safe!

Follow me on Instagram at Fitnessbyclaire or on Twitter @Levyii Join us on Facebook at Fitness By Claire

Upper Body Exercises For You!

Pull-ups

The Proper Pull-up (Regular Grip)
Grab the pull-up bar with your hands placed about shoulder width apart and your palms facing away from you. Pull yourself upward until your chin is over the bar and complete the exercise by slowly moving to the hanging position.

Pull-ups (Negatives)

If you cannot do any pull-ups, you should try “negatives”. Negatives are half pull-ups. All you have to do is get your chin over the bar by standing on something or having spotter push you over the bar. Then, you slowly lower yourself all the way down – let your arms hang grasping the bar fully stretched. Keep your feet up and fight gravity for a count of 5 seconds. This will get your arms used to supporting your weight.

Assisted Pull-ups

This is the first step to being able to perform pullups. Using the bar that is 3-4 feet off the ground, sit under it and grab with the regular grip. Straighten your back, hips, and slightly bend your knees while your feet remain on the floor and pull yourself to the bar so that your chest touches the bar. Repeat as required. This is a great way to start out if you cannot do any pull-ups at all. You can also do this on a pair of parallel bars that are used for dips. These are also great to do after you can no longer perform anymore dead-hang pullups. This is a good replacement for the Lat Pulldown machine as well

One Arm Dumb Bell Row

one arm dumb bell row

Follow these steps to perform this exercise:

Stand to the right of your weight bench, holding a dumbbell in your right hand with your palm facing in. Place your left knee and your left hand on top of the bench for support. Let your right arm hang down and a bit forward. Pull your abdominals in and bend forward from the hips so that your back is naturally arched and roughly parallel to the floor, and your right knee is slightly bent.
Tilt your chin toward your chest so that your neck is in line with the rest of your spine. Pull your right arm up until your elbow is pointing to the ceiling, your upper arm is parallel to the floor, and your hand comes to the outside of the ribcage. Lower the weight slowly back down.

Keep these tips in mind as you perform this exercise:
Concentrate on pulling from your back muscles (right behind and below your shoulder). Don’t just move your arm up and down. Although your arm is moving, this is a back exercise.
Think of your arm as a hook that connects to the weight and is pulled by the back. Keep your abs pulled in tight throughout the motion. Don’t let your back sag toward the floor or hunch up. Pull your shoulders back and down to set the shoulder blades.

Diamond Push Ups

Diamond Push Ups

Find a place with an open space. Get a mat to start this off or just do it normally anywhere. It’s best to start somewhere with a soft floor in case you can’t handle the pressure. Move both of your hands under your chest (breast area) and make a pyramid-like with your hands. Your pointing fingers should touch and your thumb should touch on the bottom which forms a pyramid, also known as a diamond to most. Slowly adjust and push your body down while you are at the diamond position. Make sure it is straight to avoid injury and back strains

Dips

Dips

What are Dips?

Raise yourself on 2 supports with elbows locked. Lower your body until your shoulders are lower than your elbows. Push yourself up by straightening your arms.

Variations for Dips:
Parallel Bar Dips. Parallel bars that are 55cm/22″ apart. My Squat Rack has 2 removable parallel bars I use for Dips.

Bench Dips. Feet elevated, hands on a bench. Avoid. The torso position is unhealthy for your shoulders, especially when you do them weighted.

Benefits of Dips.

Push-ups have your feet planted. Dips move your whole body through space. Dips are harder and thus superior to Push-ups because you have to balance your body. Other benefits of Dips: Build Strength. Dips build lockout strength: straightening your elbows. This helps the Bench Press & the Overhead Press. Build Muscle. Dips will develop your triceps & chest muscles.

Rehab.

Try Dips if you can’t do the Bench Press because of a shoulder injury. Dips work similar muscles, do them if your shoulders can take it.

But always apply the following rules on Dips:

Squeeze The Bar. Put your thumbs around the bar & squeeze it hard. The more force you apply to the bar, the stronger you are. Look Forward. Don’t look straight forward, don’t look the floor. Look to a point slightly in front of you.

Breathing.

Take a big breathe while hanging with locked elbows & hold it. Lower yourself & come back up. Breathe at the top, not during reps.

Chest Up.

Don’t let your shoulders roll forward. Keep your chest up & shoulders back. It’s easier on your shoulders. Bend Your Legs. And cross your feet. Letting your legs hang means less strength in my experience. Squeeze your glutes on the way up.

Break Parallel.

Your shoulders must go lower than your elbows. Deeper stretches your chest more, but your shoulders might not agree with it. Lock Elbows. Drive out of the bottom until your elbows are locked. Squeeze your triceps. No partial Dips

Want more fitness tips? Follow me on Instagram and on Twitter